前言
探寻一个事物的组成,不妨事先自我设想一下,这样才能真正明白自己的想法与他人的想法的区别
源码分析
1.怎么理解okhttp中的责任链机制
处理一次完整的http请求,如果略加详细的话,大概就是如下过程。刚开始我觉得这个还不好办,顺序执行
不就行了吗?但是仔细分析源码才发现,这个过程不就是一个类似于递归的操作吗?但是完全用递归也是不太
优雅的实现,只要充分把握返回节点,其实用一个责任链模式是最好的方案。每一个节点在调用其他节点的时候
只要处理好调用之前和调用之后做什么,就能简单的实现如下功能
2.拦截器
2.1 RetryAndFollowUpInterceptor
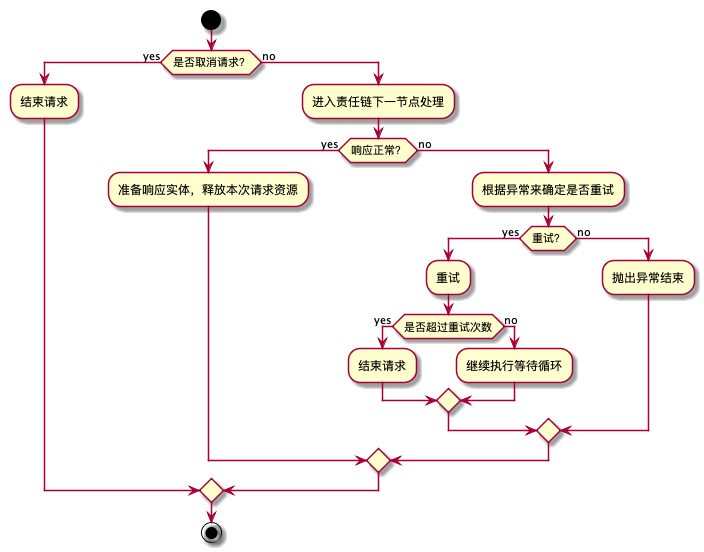
作为责任链上的五大节点中第一个节点,RetryAndFollowUpInterceptor担负着一个请求的开端和善后工作。
RetryAndFollowUpInterceptor 流程
分析每个节点需要搞清楚在调用下一节点的调用前和调用后的处理逻辑。
调用之前
RetryAndFollowUpInterceptor调用之前比较简单,判断是否已经中断任务
 1
 2
 3
 4
 5
 6
 7
 8
 9
10
11
12
@Override public Response intercept ( Chain chain ) throws IOException {
while ( true ) {
//调用点之前
if ( canceled ) {
streamAllocation . release ();
throw new IOException ( "Canceled" );
}
//调用点
response = (( RealInterceptorChain ) chain ). proceed ( request , streamAllocation , null , null );
...
}
}
调用之后
调用点之后,处理的比较多,这里只是列举重要代码
 1
 2
 3
 4
 5
 6
 7
 8
 9
10
11
12
13
14
15
16
17
18
19
20
21
22
23
24
25
26
27
28
29
30
31
32
33
34
35
36
37
38
39
40
41
42
43
44
45
46
47
48
49
50
51
52
53
54
55
56
57
58
59
60
61
62
63
64
65
66
67
68
69
70
71
72
@Override public Response intercept ( Chain chain ) throws IOException {
...
while ( true ) {
...
releaseConnection = true ;
try {
//调用点
response = (( RealInterceptorChain ) chain ). proceed ( request , streamAllocation , null , null );
releaseConnection = false ;
} catch ( RouteException e ) {
//如果路由错误并且不能恢复导致不能继续进行的情况下,直接结束请求流程
if (! recover ( e . getLastConnectException (), false , request )) {
throw e . getLastConnectException ();
}
releaseConnection = false ;
continue ;
} catch ( IOException e ) {
//检查是否由HTTP/2 connection关闭导致的原因
boolean requestSendStarted = !( e instanceof ConnectionShutdownException );
if (! recover ( e , requestSendStarted , request )) throw e ;
releaseConnection = false ;
continue ;
} finally {
//上述异常如果都不能完善处理,就一定会触发这里的释放操作。
if ( releaseConnection ) {
streamAllocation . streamFailed ( null );
streamAllocation . release ();
}
}
// 如果上一次响应存在,就将其关联在本次响应中
if ( priorResponse != null ) {
response = response . newBuilder ()
. priorResponse ( priorResponse . newBuilder ()
. body ( null )
. build ())
. build ();
}
//处理相应的状态码,具体分为Auth认证,重定向,请求超时等问题,来决定是否再次请求
Request followUp = followUpRequest ( response );
//如果响应码对于重试和重定向不是有实用价值,直接返回本次响应
if ( followUp == null ) {
if (! forWebSocket ) {
streamAllocation . release ();
}
return response ;
}
//如果需要继续重试,本次响应不能直接返回,要做关闭处理
closeQuietly ( response . body ());
//重试次数到了上限,抛出异常返回
if (++ followUpCount > MAX_FOLLOW_UPS ) {
streamAllocation . release ();
throw new ProtocolException ( "Too many follow-up requests: " + followUpCount );
}
//请求体不能被重复提交,也直接抛出异常返回
if ( followUp . body () instanceof UnrepeatableRequestBody ) {
streamAllocation . release ();
throw new HttpRetryException ( "Cannot retry streamed HTTP body" , response . code ());
}
//判断是否是可以重复使用之前的请求资源的
if (! sameConnection ( response , followUp . url ())) {
streamAllocation . release ();
streamAllocation = new StreamAllocation (
client . connectionPool (), createAddress ( followUp . url ()), callStackTrace );
} else if ( streamAllocation . codec () != null ) {
throw new IllegalStateException ( "Closing the body of " + response
+ " didn't close its backing stream. Bad interceptor?" );
}
request = followUp ;
priorResponse = response ;
}
}
2.2 BridgeInterceptor
BridgeIntercepter主要是对请求头部和响应头部的处理
调用之前
完善请求头部
 1
 2
 3
 4
 5
 6
 7
 8
 9
10
11
12
13
14
15
16
17
18
19
20
21
22
23
24
25
26
27
28
29
30
31
32
33
34
35
36
37
38
39
40
41
42
43
44
45
46
47
48
49
50
51
52
53
54
55
56
57
58
@Override public Response intercept ( Chain chain ) throws IOException {
Request userRequest = chain . request ();
Request . Builder requestBuilder = userRequest . newBuilder ();
//在okhttp中,请求体被分为FormBody和MultipartBody
RequestBody body = userRequest . body ();
if ( body != null ) {
MediaType contentType = body . contentType ();
/*
完善Content-Type请求头,在请求体部位不为空时赋值,用于表示服务器客户端传送数据类型
FormBody 默认设置为了application/x-www-form-urlencoded
MultipartBody 需要根据具体传输的文件类型来判断
*/
if ( contentType != null ) {
requestBuilder . header ( "Content-Type" , contentType . toString ());
}
/*
Transfer-Encoding 与 Content-Length本身是不支持一起使用的
okhttp中的处理是当contentLength为大于-1时,就用Content-Length头部的方式,这一点在后边使用okio书写请求体可以得到验证
当contentLength小于0时,会采用Transfer-Encoding请求头,因为Transfer-Encoding本身就多用于contentLength不明的情况下
*/
long contentLength = body . contentLength ();
if ( contentLength != - 1 ) {
requestBuilder . header ( "Content-Length" , Long . toString ( contentLength ));
requestBuilder . removeHeader ( "Transfer-Encoding" );
} else {
requestBuilder . header ( "Transfer-Encoding" , "chunked" );
requestBuilder . removeHeader ( "Content-Length" );
}
}
//填补Host
if ( userRequest . header ( "Host" ) == null ) {
requestBuilder . header ( "Host" , hostHeader ( userRequest . url (), false ));
}
//避免性能消耗,保持连接
if ( userRequest . header ( "Connection" ) == null ) {
requestBuilder . header ( "Connection" , "Keep-Alive" );
}
//告知服务器,客户端这边能够支持的内容编码格式,并且提供了gzip相应的处理方式
boolean transparentGzip = false ;
if ( userRequest . header ( "Accept-Encoding" ) == null ) {
transparentGzip = true ;
requestBuilder . header ( "Accept-Encoding" , "gzip" );
}
//添加cookies
List < Cookie > cookies = cookieJar . loadForRequest ( userRequest . url ());
if (! cookies . isEmpty ()) {
requestBuilder . header ( "Cookie" , cookieHeader ( cookies ));
}
//浏览器客户端信息
if ( userRequest . header ( "User-Agent" ) == null ) {
requestBuilder . header ( "User-Agent" , Version . userAgent ());
}
Response networkResponse = chain . proceed ( requestBuilder . build ());
...
}
调用之后
 1
 2
 3
 4
 5
 6
 7
 8
 9
10
11
12
13
14
@Override public Response intercept ( Chain chain ) throws IOException {
...
Response networkResponse = chain . proceed ( requestBuilder . build ());
HttpHeaders . receiveHeaders ( cookieJar , userRequest . url (), networkResponse . headers ());
Response . Builder responseBuilder = networkResponse . newBuilder (). request ( userRequest );
//针对Content-Encoding gzip 做的操作,对响应体进行Gzip 解码,将处理后的响应体再返回
if ( transparentGzip && "gzip" . equalsIgnoreCase ( networkResponse . header ( "Content-Encoding" )) && HttpHeaders . hasBody ( networkResponse )) {
GzipSource responseBody = new GzipSource ( networkResponse . body (). source ());
Headers strippedHeaders = networkResponse . headers (). newBuilder (). removeAll ( "Content-Encoding" ). removeAll ( "Content-Length" ). build ();
responseBuilder . headers ( strippedHeaders );
responseBuilder . body ( new RealResponseBody ( strippedHeaders , Okio . buffer ( responseBody )));
}
return responseBuilder . build ();
}
处理接收头部
2.3 CacheInterceptor
调用之前
在最开始,CacheInterceptor会根据具体的情况来获得相应的CacheStrategy
具体分类如下
 1
 2
 3
 4
 5
 6
 7
 8
 9
10
11
12
13
14
15
16
17
18
19
20
21
22
23
24
25
26
27
28
29
30
31
32
33
34
35
36
37
38
39
1.没有response缓存
    CacheStrategy --> networkRequest ->存在
    CacheStrategy --> cacheResponse ->null

2.https请求 但是 Response没有握手
    CacheStrategy --> networkRequest ->存在
    CacheStrategy --> cacheResponse ->null

3.https 并且是 没有握手
    CacheStrategy --> networkRequest ->存在
    CacheStrategy --> cacheResponse ->null

4.request 和 response 其中至少有一个no-store
    CacheStrategy --> networkRequest ->存在
    CacheStrategy --> cacheResponse ->null

5.request请求头包含 no-cache 或者If-Modified-Since 或者If-None-Match
    CacheStrategy --> networkRequest ->存在
    CacheStrategy --> cacheResponse ->null

6.response 响应头中 etag ,Date,Last-Modified为null,
    CacheStrategy --> networkRequest ->存在
    CacheStrategy --> cacheResponse ->null

7.经过计算,返回数据还在有效期
    CacheStrategy --> networkRequest ->null
    CacheStrategy --> cacheResponse ->存在

8.response 响应头中 etag ,Date,Last-Modified为null,
    CacheStrategy --> networkRequest ->存在
    CacheStrategy --> cacheResponse ->null

9.除开以上情况
    CacheStrategy --> networkRequest ->存在
    CacheStrategy --> cacheResponse ->存在

10.以上处理之后的CacheStrategy networkRequest不为空时,并且存在only-if-cached
    CacheStrategy --> networkRequest ->null
    CacheStrategy --> cacheResponse ->null
接着根据CacheStrategy来做出是否直接调用缓存等操作
 1
 2
 3
 4
 5
 6
 7
 8
 9
10
11
12
13
14
15
16
17
18
19
20
21
22
23
24
25
26
27
28
29
@Override
public Response intercept ( Chain chain ) throws IOException {
Response cacheCandidate = cache != null ? cache . get ( chain . request ()): null ;
long now = System . currentTimeMillis ();
CacheStrategy strategy = new CacheStrategy . Factory ( now , chain . request (), cacheCandidate ). get ();
Request networkRequest = strategy . networkRequest ;
Response cacheResponse = strategy . cacheResponse ;
if ( cache != null ) {
cache . trackResponse ( strategy );
}
//CacheStrategy 中 cacheResponse 为null的情况,不需要缓存,要重新通过网络请求
if ( cacheCandidate != null && cacheResponse == null ) {
closeQuietly ( cacheCandidate . body ()); // The cache candidate wasn't applicable. Close it.
}
//CacheStrategy 中 networkRequest 和 cacheResponse 都为null时,okhttp时处理成服务器请求超时
if ( networkRequest == null && cacheResponse == null ) {
return new Response . Builder (). request ( chain . request ()). protocol ( Protocol . HTTP_1_1 ). code ( 504 ). message ( "Unsatisfiable Request (only-if-cached)" )
. body ( Util . EMPTY_RESPONSE ). sentRequestAtMillis (- 1L ). receivedResponseAtMillis ( System . currentTimeMillis ()). build ();
}
//CacheStrategy 中 networkRequest 为null ,cacheResponse 不为null,使用缓存
if ( networkRequest == null ) {
return cacheResponse . newBuilder (). cacheResponse ( stripBody ( cacheResponse )). build ();
}
//CacheStrategy 中 networkRequest 不为null ,不使用缓存,使用网络请求
networkResponse = chain . proceed ( networkRequest );
...
}
以上可以知道CacheStrategy中networkRequest为控制是否使用网络请求,cacheResponse控制是否使用缓存
调用之后
 1
 2
 3
 4
 5
 6
 7
 8
 9
10
11
12
13
14
@Override public Response intercept ( Chain chain ) throws IOException {
...
Response networkResponse = null ;
//调用点
networkResponse = chain . proceed ( networkRequest );
...
//除开一些特殊响应码,只要存在实体内容,就对其进行缓存
if ( HttpHeaders . hasBody ( response )) {
CacheRequest cacheRequest = maybeCache ( response , networkResponse . request (), cache );
response = cacheWritingResponse ( cacheRequest , response );
}
return response ;
}
2.4 ConnectInterceptor
调用之前
代码如下
 1
 2
 3
 4
 5
 6
 7
 8
 9
10
11
12
13
@Override
public Response intercept ( Chain chain ) throws IOException {
RealInterceptorChain realChain = ( RealInterceptorChain ) chain ;
Request request = realChain . request ();
StreamAllocation streamAllocation = realChain . streamAllocation ();
boolean doExtensiveHealthChecks = ! request . method (). equals ( "GET" );
//分配资源
HttpCodec httpCodec = streamAllocation . newStream ( client , doExtensiveHealthChecks );
RealConnection connection = streamAllocation . connection ();
//调用点,将结果直接返回,交给CacheIntercepter来处理
return realChain . proceed ( request , streamAllocation , httpCodec , connection );
}
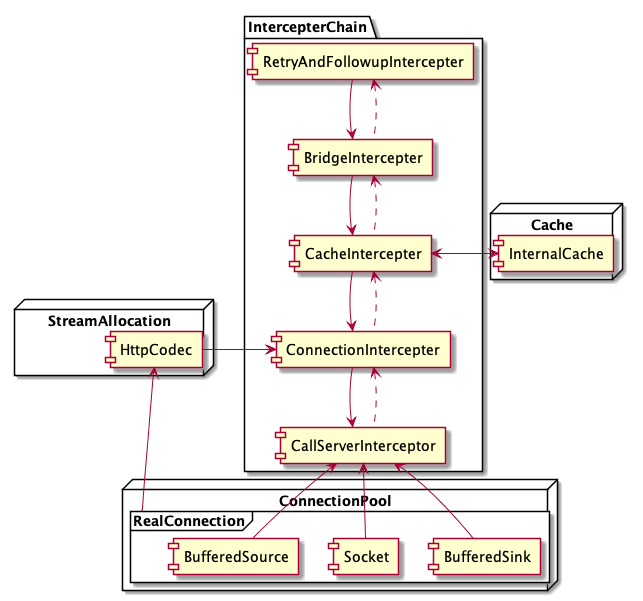
ConnectionIntercpter 分配链接资源
ConnectInterceptor由于代码调用比较深入,这里笔者还是愿意用一个结构图来形象表达,上图可以知道,在进入最后真正网络请求之前,
装配好了一个HttpCodec,传入最后CallServerInterceptor,这个HttpCodec实际上由Socket,BufferedSource,BufferedSink
组成,Socket不用说了,BufferedSource,BufferedSink就是okio的常用类,这三个类相互配合,完成网络请求和网络响应。
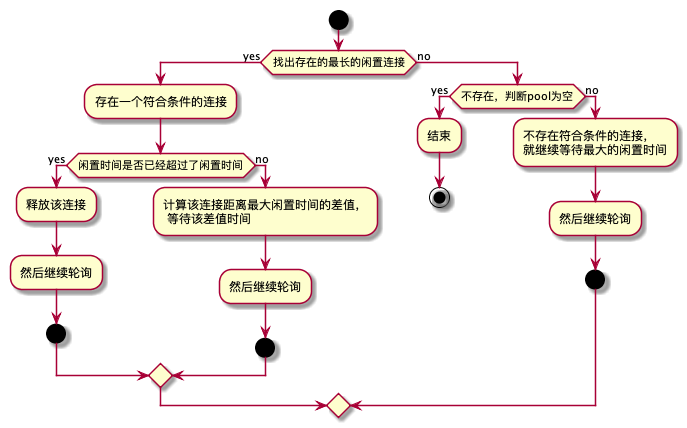
HttpCodec 获取RealConnection需要从ConnectionPool中去获取,ConnectionPool中有一个线程开启一个大循环来专门定时清理一些闲置的
连接来释放一些资源,具体算法流程如下
如果线程因为pool为空而被终止,在新添加connection时,又回重启一个相同线程,并且保证该任务线程独一份。
1
2
3
4
5
6
7
8
9
void put ( RealConnection connection ) {
assert ( Thread . holdsLock ( this ));
//保证有连接时,开启清理线程。
if (! cleanupRunning ) {
cleanupRunning = true ;
executor . execute ( cleanupRunnable );
}
connections . add ( connection );
}
调用之后
直接返回响应结果
2.5 CallServerInterceptor
走到这一步了,我相信大家都能猜到最后一个CallServerInterceptor会做些什么了,CallServerInterceptor是真正完成网络通讯的
组件
 1
 2
 3
 4
 5
 6
 7
 8
 9
10
11
12
13
14
15
16
17
18
19
20
21
22
23
24
25
26
27
28
29
@Override public Response intercept ( Chain chain ) throws IOException {
HttpCodec httpCodec = (( RealInterceptorChain ) chain ). httpStream ();
StreamAllocation streamAllocation = (( RealInterceptorChain ) chain ). streamAllocation ();
Request request = chain . request ();
long sentRequestMillis = System . currentTimeMillis ();
//写入请求头
httpCodec . writeRequestHeaders ( request );
//写入请求实体
if ( HttpMethod . permitsRequestBody ( request . method ()) && request . body () != null ) {
Sink requestBodyOut = httpCodec . createRequestBody ( request , request . body (). contentLength ());
BufferedSink bufferedRequestBody = Okio . buffer ( requestBodyOut );
request . body (). writeTo ( bufferedRequestBody );
bufferedRequestBody . close ();
}
//推送给服务端
httpCodec . finishRequest ();
//从服务端获取响应实体
Response response = httpCodec . readResponseHeaders ()
. request ( request )
. handshake ( streamAllocation . connection (). handshake ())
. sentRequestAtMillis ( sentRequestMillis )
. receivedResponseAtMillis ( System . currentTimeMillis ())
. build ();
...
return response ;
}
}
以上都好理解,但是有些地方值得我们深入理解。
okio的的创建
这一点其实要回归到上一级ConnectInterceptor中,在创建一个新RealConnection时,会调用socket建立网络连接
 1
 2
 3
 4
 5
 6
 7
 8
 9
10
11
12
13
14
15
16
17
18
19
20
21
private void connectSocket ( int connectTimeout , int readTimeout ) throws IOException {
Proxy proxy = route . proxy ();
Address address = route . address ();
rawSocket = proxy . type () == Proxy . Type . DIRECT || proxy . type () == Proxy . Type . HTTP
? address . socketFactory (). createSocket ()
: new Socket ( proxy );
rawSocket . setSoTimeout ( readTimeout );
try {
//socket发起连接
Platform . get (). connectSocket ( rawSocket , route . socketAddress (), connectTimeout );
} catch ( ConnectException e ) {
ConnectException ce = new ConnectException ( "Failed to connect to " + route . socketAddress ());
ce . initCause ( e );
throw ce ;
}
//连接创建成功,将控制权交给okio
source = Okio . buffer ( Okio . source ( rawSocket ));
sink = Okio . buffer ( Okio . sink ( rawSocket ));
}
从上述代码中我们可以知道,RealConnection会先建立Socket的长连接,然后将其赋值给okio来创建出操作句柄
BufferedSource 和 BufferedSink。之后的所有发送请求和响应请求都是通过okio的写入读出来完成的。
 1
 2
 3
 4
 5
 6
 7
 8
 9
10
11
12
13
14
15
16
17
18
19
20
21
22
23
24
25
26
27
28
29
30
31
32
/*
* Http1Codec
*/
//写入操作
public void writeRequest ( Headers headers , String requestLine ) throws IOException {
if ( state != STATE_IDLE ) throw new IllegalStateException ( "state: " + state );
sink . writeUtf8 ( requestLine ). writeUtf8 ( "\r\n" );
//okio写入
for ( int i = 0 , size = headers . size (); i < size ; i ++) {
sink . writeUtf8 ( headers . name ( i ))
. writeUtf8 ( ": " )
. writeUtf8 ( headers . value ( i ))
. writeUtf8 ( "\r\n" );
}
sink . writeUtf8 ( "\r\n" );
state = STATE_OPEN_REQUEST_BODY ;
}
//读出操作
public Response . Builder readResponse () throws IOException {
...
while ( true ) {
//okio读取操作
StatusLine statusLine = StatusLine . parse ( source . readUtf8LineStrict ());
Response . Builder responseBuilder = new Response . Builder (). protocol ( statusLine . protocol ). code ( statusLine . code ). message ( statusLine . message ). headers ( readHeaders ());
if ( statusLine . code != HTTP_CONTINUE ) {
state = STATE_OPEN_RESPONSE_BODY ;
return responseBuilder ;
}
}
...
}
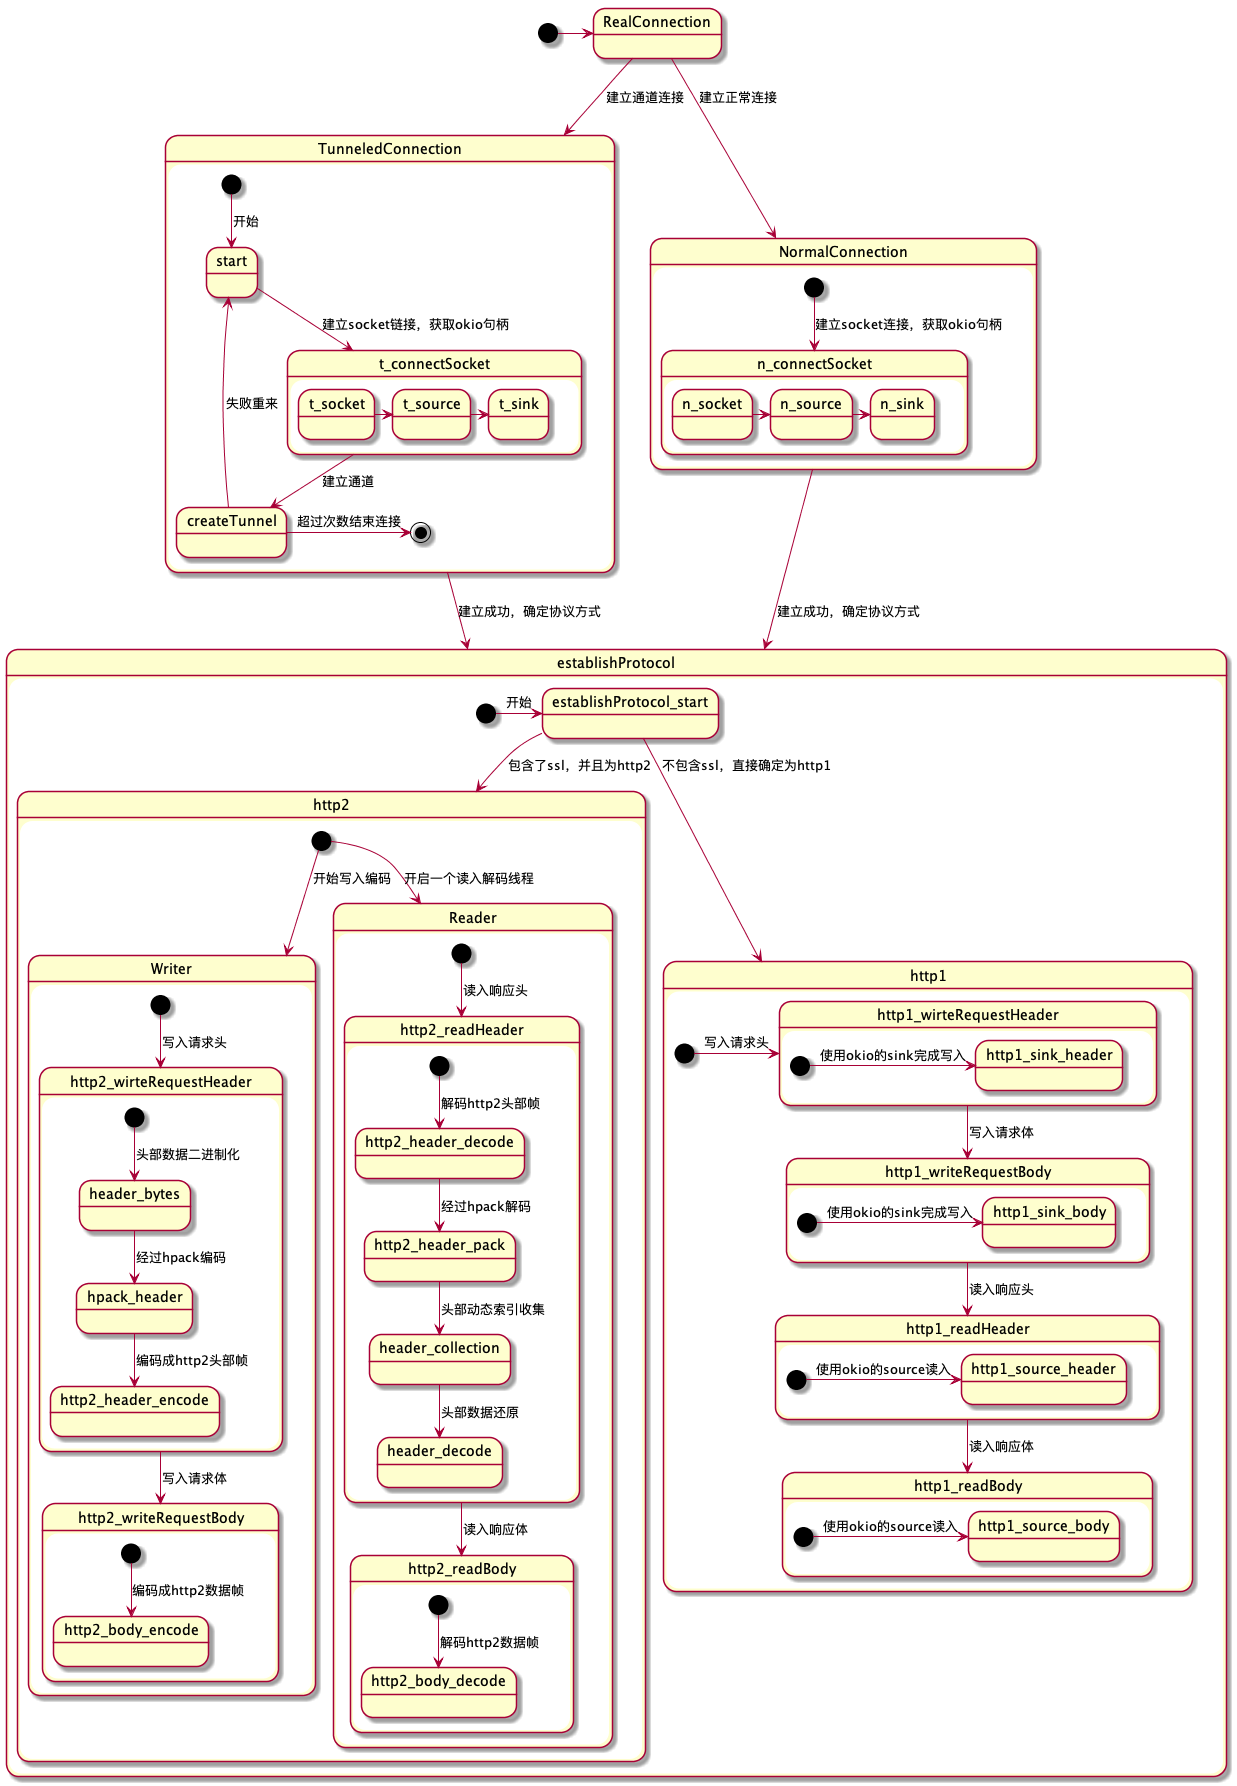
Http1 和 Http2
okhttp中比较有学习价值的一个点就是使用okio来实现http1和http2的通讯,并且是完全根据协议标准采用了写流的方式实现通讯,这一点对于熟悉http
协议提供一份很好的参照代码。
当然这里我们着重介绍比较复杂的http2的通讯过程,http1协议都是收发和数据封装比较简单,在上一节介绍ConnectInterceptor时已经有过说明了。
http2是一个二进制协议而,http1是超文本协议.传输的内容都不是一样的,http2采用的帧的方式,在封装上会较为复杂些。
上图大致描绘了okhttp在连接时的主要流程。从图中我们了解到了http2的写入和读出分为两个线程,因为写入和读出都有分帧操作,封装比较复杂,这种
二进制化传输比http1的文本化传输有更大的操作空间,不需要频繁创建连接,可以重复利用资源,并且头部使用了hpack编码方式,可以减少头部占用了
传输数据大小,更为精简。其实http2完全需要另写一篇,介于篇幅,这里就不过多介绍了。
2.6 自定义拦截器
okhttp提供了两种拦截器形式,普通拦截器和网络拦截器。关于普通拦截器最常见的就是一个日志打印功能,网络拦截器可以干预网络请求过程中的数据改变。
其实在代码中我们就能大概猜到这两种拦截器的功能区别
 1
 2
 3
 4
 5
 6
 7
 8
 9
10
11
12
13
14
15
16
17
Response getResponseWithInterceptorChain () throws IOException {
List < Interceptor > interceptors = new ArrayList <>();
//普通拦截器
interceptors . addAll ( client . interceptors ());
interceptors . add ( retryAndFollowUpInterceptor );
interceptors . add ( new BridgeInterceptor ( client . cookieJar ()));
interceptors . add ( new CacheInterceptor ( client . internalCache ()));
interceptors . add ( new ConnectInterceptor ( client ));
//网络拦截器
if (! forWebSocket ) {
interceptors . addAll ( client . networkInterceptors ());
}
interceptors . add ( new CallServerInterceptor ( forWebSocket ));
Interceptor . Chain chain = new RealInterceptorChain (
interceptors , null , null , null , 0 , originalRequest );
return chain . proceed ( originalRequest );
}
普通拦截器放置于最开始,可以对于初始化的网络请求数据和最后返回的数据进行一个加工处理,基本不能改变网络请求的本体过程(因为没有真正突破缓存层
CacheIntercepter)。但是网络拦截器处于ConnectInterceptor和CallServerInterceptor之间,能干预网络请求和返回的数据处理。这个也是两者
的根本区别。
自定义编写拦截器需要把握好下一链的调用位置。因为根据以上五大拦截器的分析知道,这决定了你是在“进去”还是“回来”的时机问题。
3.功能分析
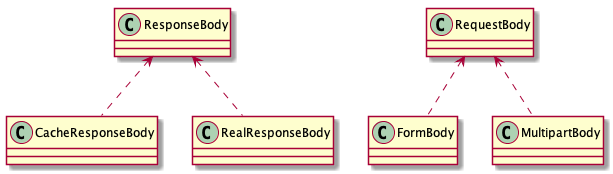
RequestBody 与 ResponseBody
RequestBody 与 ResponseBody
RequestBody 主要有两个实现类,FormBody和MultipartBody,FormBody主要用于常规key-value等请求使用;MultipartBody用于处理多类型
表单处理,比如上传文件这类操作。
虽然在CallServerIntecerpter中调用了okio对请求头进行写入,但是请求体的写入具体实现是放在RequestBody中的。
ResponseBody 主要实现类是CacheResponseBody和RealResponseBody,CacheResponseBody主要用于Cache,用来区别网络请求的响应体
RealResponseBody才是真正的网络请求返回的响应体的封装。
okhttp在平时获取返回值的时候有个特点,那就是获取数据的api只能调用一次,再次调用就会报错,主要是ResponseBody是并不保存响应体,而是
保存获取响应体的source句柄,所以只能获取一次。
4.初尝okio
square出品的okhttp是由其出品的okio封装的,Okio 堪称小而美,后续笔者也会继续分析okio的源码。毕竟深入理解,才是学习的本质。
感谢
1.Content-Length的作用
https://blog.csdn.net/qq_29951983/article/details/83051023
2.http2协议帧格式
http://www.blogjava.net/yongboy/archive/2015/03/20/423655.html
3.http1和http2
https://segmentfault.com/a/1190000006923359
4.HPACK原理
https://www.jianshu.com/p/f44b930cfcac