前言
本文分析源码来自android 9.0
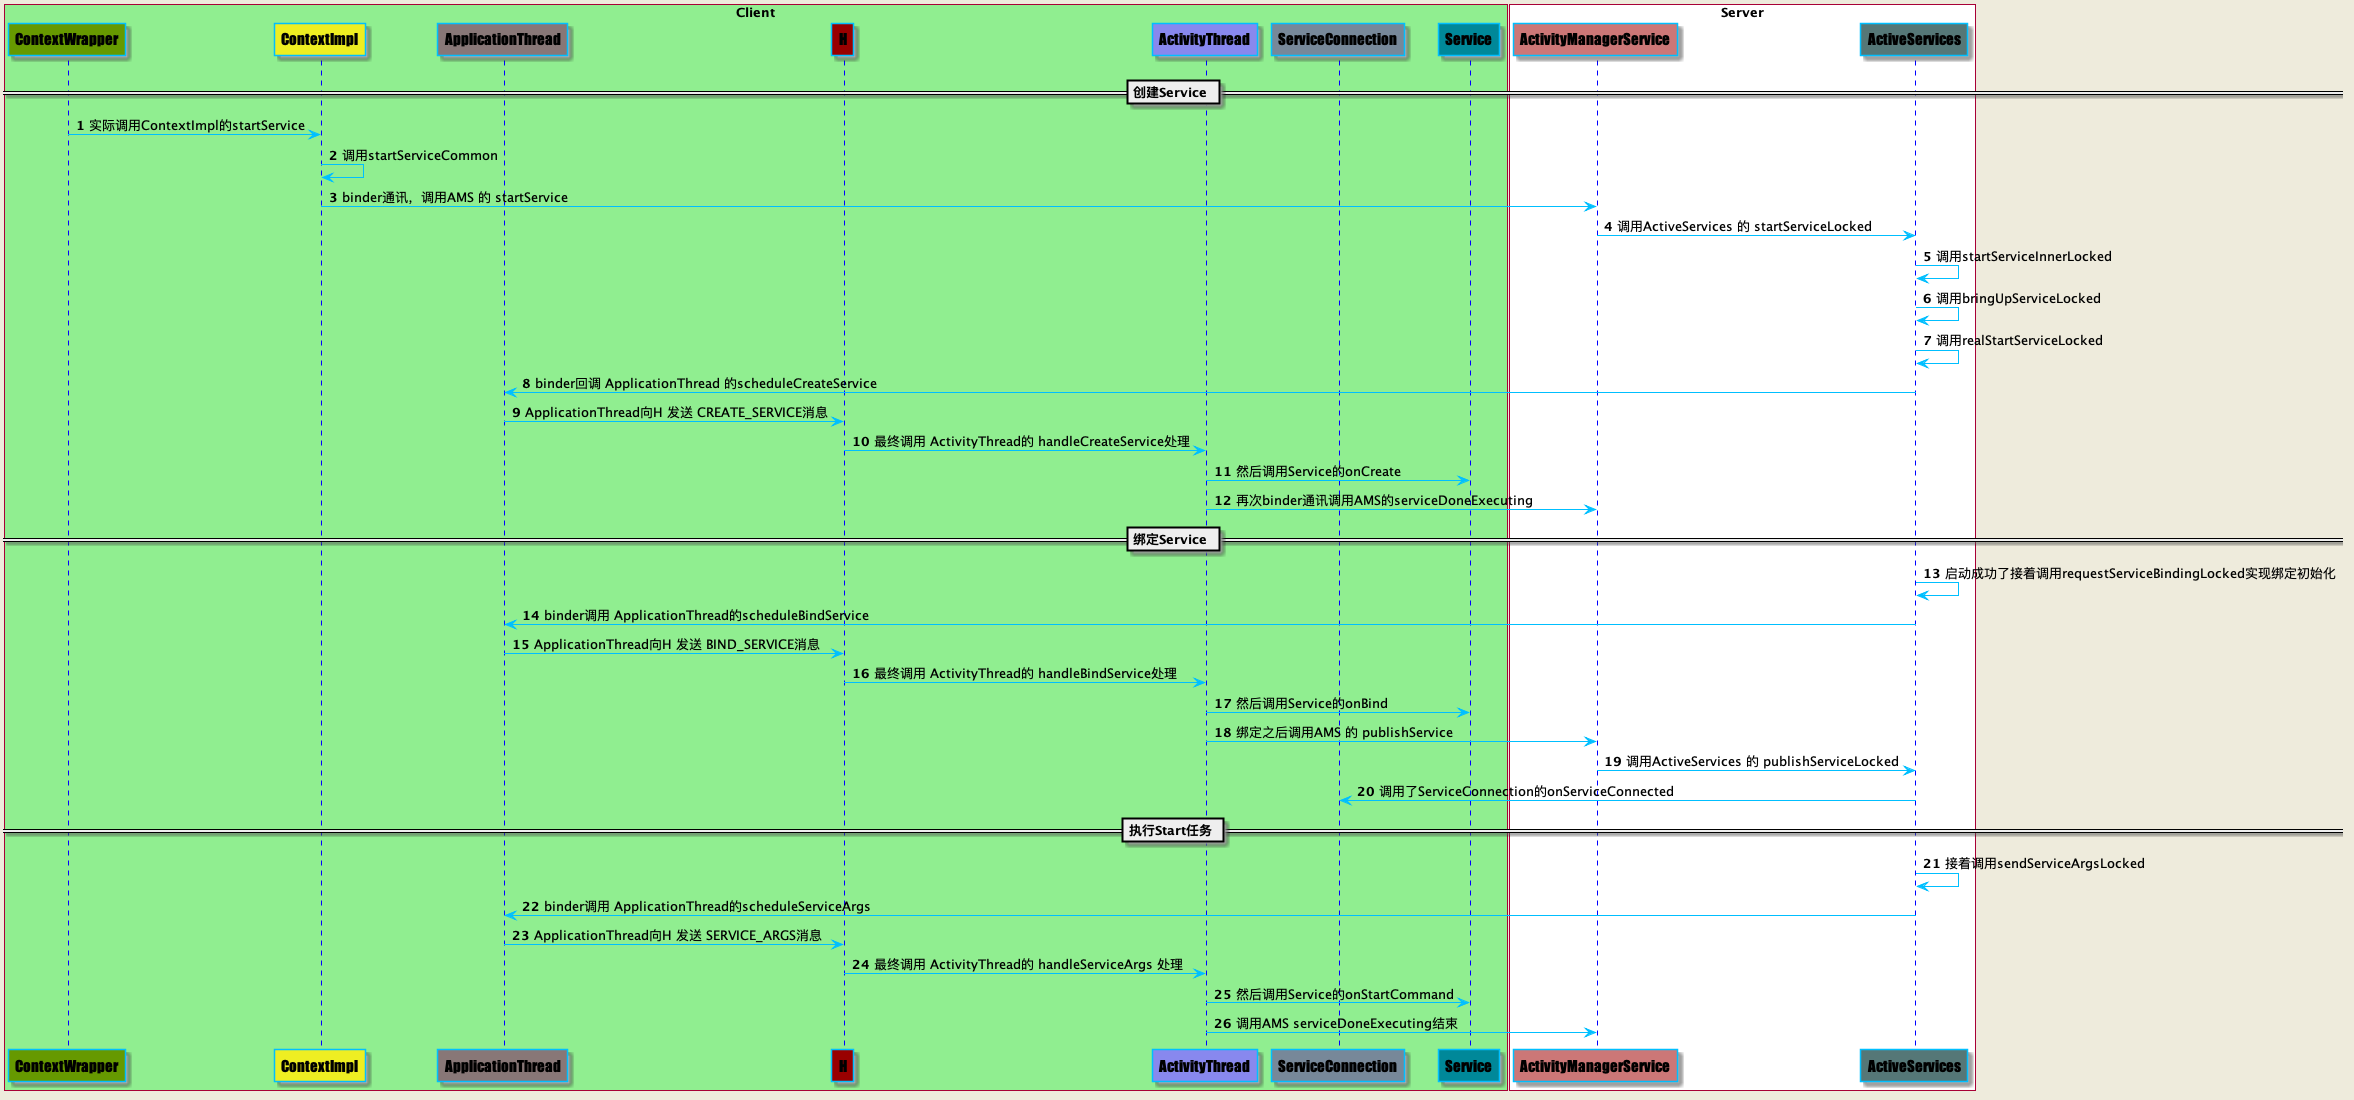
启动分析
如果直接调用startService来启动Service,一个完整流程大致如上时序图所示。主要经历了创建
Service,绑定Service,执行Start任务的三个过程。
创建初始化
Service 和Activity都是继承于ContextWrapper,创建Service的请求实际是ContextWrapper发出,ContextWrapper将交给
一个mBase的Context去调用,这个Context的具体实现其实是ContextImpl,在组件被创建时在其attachBaseContext
中被赋值
 1
 2
 3
 4
 5
 6
 7
 8
 9
10
11
12
13
14
15
16
17
18
19
20
21
//ContextWrapper.java
protected void attachBaseContext ( Context base ) {
if ( mBase != null ) {
throw new IllegalStateException ( "Base context already set" );
}
mBase = base ;
}
//Activity.java
final void attach ( Context context ,...) {
attachBaseContext ( context );
}
//ActivityThread.java
private Activity performLaunchActivity ( ActivityClientRecord r , Intent customIntent ) {
...
ContextImpl appContext = createBaseContextForActivity ( r );
...
activity . attach ( appContext , ...);
...
}
在ContextImpl中继续调用startServiceCommon来传递命令,之后就开始Binder请求向AMS发送命令。
1
2
3
4
5
6
7
8
private ComponentName startServiceCommon ( Intent service , boolean requireForeground , UserHandle user ) {
...
ComponentName cn = ActivityManager . getService (). startService (
mMainThread . getApplicationThread (), service , service . resolveTypeIfNeeded (
getContentResolver ()), requireForeground ,
getOpPackageName (), user . getIdentifier ());
...
}
到了AMS,也是继续分发,这里是交给一个ActiveServices的类来管理,基本所有有关于Service的业务都是经过ActiveServices来
处理。
1
2
3
4
5
6
7
8
9
//ActivityManagerService.java
final ActiveServices mServices ;
public ComponentName startService ( IApplicationThread caller , Intent service , String resolvedType , boolean requireForeground , String callingPackage , int userId ) throws TransactionTooLargeException {
...
res = mServices . startServiceLocked ( caller , service , resolvedType , callingPid , callingUid , requireForeground , callingPackage , userId );
...
}
继续分发给了ActiveServices的startServiceInnerLocked,在启动之前会对所操作的Service的信息进行一个校验。之后会调用
bringUpServiceLocked,这时才真正进入创建Service的时候。
 1
 2
 3
 4
 5
 6
 7
 8
 9
10
11
12
13
14
15
16
17
//ActiveService.java
ComponentName startServiceLocked (...) throws TransactionTooLargeException {
...
//对Service的信息一个校验
ServiceLookupResult res = retrieveServiceLocked ( service , resolvedType , callingPackage , callingPid , callingUid , userId , true , callerFg , false , false );
...
//启动
ComponentName cmp = startServiceInnerLocked ( smap , service , r , callerFg , addToStarting );
...
}
ComponentName startServiceInnerLocked (...) throws TransactionTooLargeException {
ServiceState stracker = r . getTracker ();
...
String error = bringUpServiceLocked ( r , service . getFlags (), callerFg , false , false );
...
}
在bringUpServiceLocked中,比较重要的两个地方,如下在最开始会判断ServiceRecord的一个对象r的存在情况,
只要ServiceRecord这些信息健全,就表示Service已经存在,就直接用sendServiceArgsLocked,这个sendServiceArgsLocked
方法会直接触发Service的onStartCommand的回调,后边也会继续分析解释。
再者就进入realStartServiceLocked方法,光看名字就知道realStartServiceLocked才是真正的主角。
 1
 2
 3
 4
 5
 6
 7
 8
 9
10
private String bringUpServiceLocked (...) throws TransactionTooLargeException {
...
if ( r . app != null && r . app . thread != null ) {
sendServiceArgsLocked ( r , execInFg , false );
return null ;
}
...
realStartServiceLocked ( r , app , execInFg );
...
}
创建
在realStartServiceLocked中开始真正的创建工作。
1
2
3
4
5
6
7
//ActiveServices.java
private final void realStartServiceLocked ( ServiceRecord r , ProcessRecord app , boolean execInFg ) throws RemoteException {
...
app . thread . scheduleCreateService ( r , r . serviceInfo , mAm . compatibilityInfoForPackageLocked ( r . serviceInfo . applicationInfo ),
app . repProcState );
...
}
app.thread就是IApplicationThread,将创建任务指令发送给了ApplicationThread。ApplicationThread向H发送
CREATE_SERVICE消息,最终调用了ActivityThread的handleCreateService方法。
 1
 2
 3
 4
 5
 6
 7
 8
 9
10
11
12
13
14
15
16
17
18
19
20
21
22
23
24
25
26
public final class ActivityThread extends ClientTransactionHandler {
...
final H mH = new H ();
...
private void handleCreateService ( CreateServiceData data ) {
...
ContextImpl context = ContextImpl . createAppContext ( this , packageInfo );
context . setOuterContext ( service );
Application app = packageInfo . makeApplication ( false , mInstrumentation );
service . attach ( context , this , data . info . name , data . token , app , ActivityManager . getService ());
service . onCreate ();
mServices . put ( data . token , service );
...
}
...
private class ApplicationThread extends IApplicationThread . Stub {
public final void scheduleCreateService ( IBinder token , ServiceInfo info , CompatibilityInfo compatInfo , int processState ){
...
sendMessage ( H . CREATE_SERVICE , s );
}
}
...
}
一个比较值得注意的地方,一个Service的创建的同时会为其新创建一个Application对象,其实每个ActivityThread中都有一个Application
的集合,用于保存这些在组件创建中产生的Application。
然后Service调用了attach方法,绑定关系,主要是将各个主要进程对象绑定到Service上,在9.0的源码中我们发现该方法有一个@hide注解,
一般有这个注解的都是不能直接反射。新版的android sdk对这些方法都是管理比较严格
 1
 2
 3
 4
 5
 6
 7
 8
 9
10
11
12
13
14
15
16
/**
* @hide
*/
public final void attach (
Context context ,
ActivityThread thread , String className , IBinder token ,
Application application , Object activityManager ) {
attachBaseContext ( context );
mThread = thread ; // NOTE: unused - remove?
mClassName = className ;
mToken = token ;
mApplication = application ;
mActivityManager = ( IActivityManager ) activityManager ;
mStartCompatibility = getApplicationInfo (). targetSdkVersion
< Build . VERSION_CODES . ECLAIR ;
}
然后Servide就会执行我们最熟悉的onCreate方法,这里完成我们的初始化代码,最后binder通讯向AMS调用serviceDoneExecuting
绑定
我们需要再回到ActiveServices的realStartServiceLocked方法中,在上述创建之后,会继续执行到requestServiceBindingsLocked
方法。
 1
 2
 3
 4
 5
 6
 7
 8
 9
10
11
12
13
14
15
16
17
18
19
20
21
22
23
24
25
26
//ActiveServices.java
private final void realStartServiceLocked ( ServiceRecord r , ProcessRecord app , boolean execInFg ) throws RemoteException {
...
app . thread . scheduleCreateService ( r , r . serviceInfo , mAm . compatibilityInfoForPackageLocked ( r . serviceInfo . applicationInfo ),
app . repProcState );
...
requestServiceBindingsLocked ( r , execInFg );
...
}
private final void requestServiceBindingsLocked ( ServiceRecord r , boolean execInFg )
throws TransactionTooLargeException {
for ( int i = r . bindings . size ()- 1 ; i >= 0 ; i --) {
IntentBindRecord ibr = r . bindings . valueAt ( i );
if (! requestServiceBindingLocked ( r , ibr , execInFg , false )) {
break ;
}
}
}
private final boolean requestServiceBindingLocked ( ServiceRecord r , IntentBindRecord i , boolean execInFg , boolean rebind ) throws TransactionTooLargeException {
...
r . app . thread . scheduleBindService ( r , i . intent . getIntent (), rebind ,
r . app . repProcState );
...
}
在创建完Service之后,会执行requestServiceBindingsLocked方法,该方法会循环遍历Service的绑定
关系集合,依次执行绑定操作requestServiceBindingLocked,在requestServiceBindingLocked中
最终会通过Binder执行ApplicationThread的scheduleBindService。
 1
 2
 3
 4
 5
 6
 7
 8
 9
10
11
12
13
14
15
16
17
18
19
20
21
22
public final class ActivityThread extends ClientTransactionHandler {
...
final H mH = new H ();
...
private void handleBindService ( BindServiceData data ) {
Service s = mServices . get ( data . token );
...
IBinder binder = s . onBind ( data . intent );
ActivityManager . getService (). publishService ( data . token , data . intent , binder );
...
}
...
private class ApplicationThread extends IApplicationThread . Stub {
public final void scheduleBindService ( IBinder token , ServiceInfo info , CompatibilityInfo compatInfo , int processState ){
...
sendMessage ( H . BIND_SERVICE , s );
}
}
...
}
在回调了Service的onBind之后,会让AMS 发出一个publishService操作,当然真正执行操作还是ActiveServices
 1
 2
 3
 4
 5
 6
 7
 8
 9
10
11
12
13
14
15
16
17
18
//ActiveServices.java
void publishServiceLocked ( ServiceRecord r , Intent intent , IBinder service ) {
...
Intent . FilterComparison filter = new Intent . FilterComparison ( intent );
IntentBindRecord b = r . bindings . get ( filter );
for ( int conni = r . connections . size ()- 1 ; conni >= 0 ; conni --) {
ArrayList < ConnectionRecord > clist = r . connections . valueAt ( conni );
for ( int i = 0 ; i < clist . size (); i ++) {
ConnectionRecord c = clist . get ( i );
if (! filter . equals ( c . binding . intent . intent )) {
...
c . conn . connected ( r . name , service , false );
...
}
}
}
...
}
该方法会遍历所有绑定链接集合,然后重新链接。其中的ConnectionRecord的conn其实是在LoadApk中的一个
内部类InnerConnection,最终调用的是ServiceDispatcher的connected方法。
 1
 2
 3
 4
 5
 6
 7
 8
 9
10
11
12
13
14
15
16
17
18
19
20
21
22
23
24
25
26
27
28
29
30
31
32
33
34
35
public final class LoadedApk {
...
static final class ServiceDispatcher {
...
private static class InnerConnection extends IServiceConnection . Stub {
final WeakReference < LoadedApk . ServiceDispatcher > mDispatcher ;
InnerConnection ( LoadedApk . ServiceDispatcher sd ) {
mDispatcher = new WeakReference < LoadedApk . ServiceDispatcher >( sd );
}
public void connected ( ComponentName name , IBinder service , boolean dead )
throws RemoteException {
LoadedApk . ServiceDispatcher sd = mDispatcher . get ();
if ( sd != null ) {
sd . connected ( name , service , dead );
}
}
}
...
public void connected ( ComponentName name , IBinder service , boolean dead ) {
...
doConnected ( name , service , dead );
}
public void doConnected ( ComponentName name , IBinder service , boolean dead ) {
...
if ( service != null ) {
mConnection . onServiceConnected ( name , service );
}
}
}
...
}
在调用了doConnected之后,会最终调用ServiceConnection的onServiceConnected的方法,将service的binder
对象传入。
Start任务
然后我们再回到ActiveServices的realStartServiceLocked方法中,再完成了上述两步之后,接着会调用到sendServiceArgsLocked。
我们之前提到过在创建Service之前会判断Service本身是否存在,如果存在就直接调用该方法,那该方法会完成什么操作呢?
 1
 2
 3
 4
 5
 6
 7
 8
 9
10
11
//ActiveServices.java
private final void realStartServiceLocked ( ServiceRecord r , ProcessRecord app , boolean execInFg ) throws RemoteException {
...
app . thread . scheduleCreateService ( r , r . serviceInfo , mAm . compatibilityInfoForPackageLocked ( r . serviceInfo . applicationInfo ),
app . repProcState );
...
requestServiceBindingsLocked ( r , execInFg );
...
sendServiceArgsLocked ( r , execInFg , true );
...
}
1
2
3
4
5
6
//ActiveServices.java
private final void sendServiceArgsLocked ( ServiceRecord r , boolean execInFg , boolean oomAdjusted ) throws TransactionTooLargeException {
...
r . app . thread . scheduleServiceArgs ( r , slice );
...
}
在sendServiceArgsLocked方法中最关键的步骤还是调用了ApplicationThread的scheduleServiceArgs。
 1
 2
 3
 4
 5
 6
 7
 8
 9
10
11
12
13
14
15
16
17
18
19
20
21
public final class ActivityThread extends ClientTransactionHandler {
...
final H mH = new H ();
...
private void handleServiceArgs ( ServiceArgsData data ) {
Service s = mServices . get ( data . token );
...
res = s . onStartCommand ( data . args , data . flags , data . startId );
...
}
...
private class ApplicationThread extends IApplicationThread . Stub {
public final void scheduleServiceArgs ( IBinder token , ParceledListSlice args ) {
...
sendMessage ( H . SERVICE_ARGS , s );
}
}
...
}
不出所料,scheduleServiceArgs经过分发,最终会触发到Service的onStartCommand的回调,我们在这里面实现的
Service任务代码开始执行。同时会得到一个返回值,通过serviceDoneExecutingLocked方法将返回值继续传给AMS
 1
 2
 3
 4
 5
 6
 7
 8
 9
10
11
12
13
14
15
16
17
18
19
20
21
22
23
24
25
26
27
28
29
30
31
32
33
void serviceDoneExecutingLocked ( ServiceRecord r , int type , int startId , int res ) {
...
switch ( res ) {
case Service . START_STICKY_COMPATIBILITY :
case Service . START_STICKY : {
r . findDeliveredStart ( startId , false , true );
r . stopIfKilled = false ;
break ;
}
case Service . START_NOT_STICKY : {
r . findDeliveredStart ( startId , false , true );
if ( r . getLastStartId () == startId ) {
r . stopIfKilled = true ;
}
break ;
}
case Service . START_REDELIVER_INTENT : {
ServiceRecord . StartItem si = r . findDeliveredStart ( startId , false , false );
if ( si != null ) {
si . deliveryCount = 0 ;
si . doneExecutingCount ++;
r . stopIfKilled = true ;
}
break ;
}
case Service . START_TASK_REMOVED_COMPLETE : {
r . findDeliveredStart ( startId , true , true );
break ;
}
default:
throw new IllegalArgumentException ( "Unknown service start result: " + res );
...
}
返回值的处理就是Service的几种模式描述的处理,对比代码,发现基本是改变ServiceRecord的stopIfKilled。当我搜索源码时
只发现在ActiveServices中的killServicesLocked方法中发挥作用
 1
 2
 3
 4
 5
 6
 7
 8
 9
10
11
12
13
14
15
final void killServicesLocked ( ProcessRecord app , boolean allowRestart ) {
...
if ( sr . startRequested && ( sr . stopIfKilled || canceled )) {
if ( sr . pendingStarts . size () == 0 ) {
sr . startRequested = false ;
if ( sr . tracker != null ) {
sr . tracker . setStarted ( false , mAm . mProcessStats . getMemFactorLocked (), SystemClock . uptimeMillis ());
}
if (! sr . hasAutoCreateConnections ()) {
bringDownServiceLocked ( sr );
}
}
}
...
}
这个地方只是决定了在清理服务时会不会直接清理的逻辑,而对于Service的关于STICKY的几种模式的描述还是不能很好的理解,
只能留下一个疑问了。
停止分析
发出停止命令
命令还是由ContextImpl发出,将stopService的命令通过Binder发送给AMS,AMS会继续分发,最终调用
ActiveServices的bringDownServiceLocked。
 1
 2
 3
 4
 5
 6
 7
 8
 9
10
11
12
13
14
15
16
17
18
19
20
21
22
23
//ContextImpl.java
private boolean stopServiceCommon ( Intent service , UserHandle user ) {
...
int res = ActivityManager . getService (). stopService (
mMainThread . getApplicationThread (), service ,
service . resolveTypeIfNeeded ( getContentResolver ()), user . getIdentifier ());
...
}
//ActivityManagerService.java
public int stopService ( IApplicationThread caller , Intent service ,
String resolvedType , int userId ) {
...
return mServices . stopServiceLocked ( caller , service , resolvedType , userId );
}
//ActiveServices.java
private void stopServiceLocked ( ServiceRecord service ) {
...
bringDownServiceIfNeededLocked ( service , false , false );
}
private final void bringDownServiceIfNeededLocked ( ServiceRecord r , boolean knowConn , boolean hasConn ) {
...
bringDownServiceLocked ( r );
}
断开链接
在bringDownServiceLocked中会先断开service的所有链接。
 1
 2
 3
 4
 5
 6
 7
 8
 9
10
11
12
private final void bringDownServiceLocked ( ServiceRecord r ) {
for ( int conni = r . connections . size ()- 1 ; conni >= 0 ; conni --) {
ArrayList < ConnectionRecord > c = r . connections . valueAt ( conni );
for ( int i = 0 ; i < c . size (); i ++) {
ConnectionRecord cr = c . get ( i );
cr . serviceDead = true ;
...
cr . conn . connected ( r . name , null , true );
...
}
}
}
在图中代码cr.conn.connected(r.name, null, true);会接着走每个绑定关系的ServiceConnection的
onServiceDisconnected,告诉客户端Service链接断开。
1
2
3
4
5
6
7
public void doConnected ( ComponentName name , IBinder service , boolean dead ) {
...
if ( old != null ) {
mConnection . onServiceDisconnected ( name );
}
...
}
解绑
再回到bringDownServiceLocked方法中,会通过onUnBind回调告诉Service完成解绑操作
 1
 2
 3
 4
 5
 6
 7
 8
 9
10
11
12
13
14
15
private final void bringDownServiceLocked ( ServiceRecord r ) {
for ( int conni = r . connections . size ()- 1 ; conni >= 0 ; conni --) {
ArrayList < ConnectionRecord > c = r . connections . valueAt ( conni );
for ( int i = 0 ; i < c . size (); i ++) {
ConnectionRecord cr = c . get ( i );
cr . serviceDead = true ;
...
cr . conn . connected ( r . name , null , true );
...
}
}
...
r . app . thread . scheduleUnbindService ( r , ibr . intent . getIntent ());
...
}
继续通过binder通讯调用ApplicaitonThread的scheduleUnbindService来完成分发。
 1
 2
 3
 4
 5
 6
 7
 8
 9
10
11
12
13
14
15
16
17
18
19
20
21
22
23
public final class ActivityThread extends ClientTransactionHandler {
...
final H mH = new H ();
...
private void handleUnbindService ( ServiceArgsData data ) {
Service s = mServices . get ( data . token );
...
boolean doRebind = s . onUnbind ( data . intent );
...
ActivityManager . getService (). serviceDoneExecuting ( data . token , SERVICE_DONE_EXECUTING_ANON , 0 , 0 );
...
}
...
private class ApplicationThread extends IApplicationThread . Stub {
public final void scheduleUnbindService ( IBinder token , ParceledListSlice args ) {
...
sendMessage ( H . UNBIND_SERVICE , s );
}
}
...
}
停止
最后发出停止操作,调用Service的onDrstory的回调,完成销毁操作
 1
 2
 3
 4
 5
 6
 7
 8
 9
10
11
12
13
14
15
16
17
private final void bringDownServiceLocked ( ServiceRecord r ) {
for ( int conni = r . connections . size ()- 1 ; conni >= 0 ; conni --) {
ArrayList < ConnectionRecord > c = r . connections . valueAt ( conni );
for ( int i = 0 ; i < c . size (); i ++) {
ConnectionRecord cr = c . get ( i );
cr . serviceDead = true ;
...
cr . conn . connected ( r . name , null , true );
...
}
}
...
r . app . thread . scheduleUnbindService ( r , ibr . intent . getIntent ());
...
r . app . thread . scheduleStopService ( r );
...
}
调用ApplicaitonThread的scheduleStopService来完成分发。
 1
 2
 3
 4
 5
 6
 7
 8
 9
10
11
12
13
14
15
16
17
18
19
20
21
22
23
public final class ActivityThread extends ClientTransactionHandler {
...
final H mH = new H ();
...
private void handleStopService ( ServiceArgsData data ) {
Service s = mServices . get ( data . token );
...
s . onDestroy ();
...
ActivityManager . getService (). serviceDoneExecuting ( data . token , SERVICE_DONE_EXECUTING_ANON , 0 , 0 );
...
}
...
private class ApplicationThread extends IApplicationThread . Stub {
public final void scheduleStopService ( IBinder token , ParceledListSlice args ) {
...
sendMessage ( H . STOP_SERVICE , s );
}
}
...
}
总结
分析完这样一个大流程,其实心很累,就像从一顿的棉花中,废了大力气,才挤了几滴水的感觉。分析Service启动过程产生了很多疑问,但是这些疑问都是
无法立马得到验证,最后只能对过程有个大概的了解。android系统源码庞大,只能一步一步慢慢的分析了。加油!